In this post we will go through the steps required to automate your End-to-End tests with Cucumber and Playwright.
Cucumber and Playwright are formidable tools in their own right, but when combined, they create a testing powerhouse that can significantly enhance the efficiency and effectiveness of your testing processes. Here’s why you would use Cucumber to drive Playwright tests:
1. Enhanced Collaboration:
Cucumber’s strength lies in its natural language, behavior-driven development (BDD) approach. It allows testers, developers, and non-technical stakeholders to collaborate effectively. With Cucumber’s human-readable scenarios, everyone involved can clearly understand and contribute to the testing process. This collaboration streamlines communication, ensuring that your tests accurately reflect your application’s expected behavior.
2. Clear Test Scenarios:
Cucumber excels at defining test scenarios using the Gherkin language, which is easy to read and write. This clarity helps in creating comprehensive test cases that leave no room for ambiguity. When coupled with Playwright’s powerful automation capabilities, you can execute these scenarios with precision, ensuring thorough test coverage.
3. Reusability and Modularity:
Cucumber promotes the creation of reusable and modular step definitions. This means that you can define test steps once and reuse them across multiple scenarios. When integrated with Playwright, these step definitions can be leveraged to create robust, maintainable test suites that are easy to update as your application evolves.
4. Cross-Browser and Cross-Platform Compatibility:
Playwright offers excellent cross-browser and cross-platform support, making it suitable for testing a wide range of web applications. When paired with Cucumber, you can define scenarios that run seamlessly on various browsers and platforms. This ensures that your application behaves consistently, regardless of the user’s choice of browser or device.
5. Reporting and Traceability:
Cucumber provides detailed test reports, making it easy to track test results and identify issues. When integrated with Playwright, you gain comprehensive insights into the status of your test suite. This reporting helps in quickly identifying and addressing any defects or regressions, ensuring the reliability of your application.
Setup
If you are using VSCode adding the Gherkin Language Support extension is recommended.
Next, add Cucumber and Playwright to your project by whatever means your package manager does this. For example, using Yarn:
yarn add -D @cucumber/cucumber @playwright/testAs we will be running our tests using the Cucumber runner rather than Playwright we need to set some things up. I usually organise my tests by creating a tests directory followed by subdirectories for end-to-end and unit tests. I can then configure the relevant subdirectory in my unit test runner such as Jest or Vitest and it will not attempt to run the Cucumber tests.
mkdir -p tests/e2e
mkdir tests/e2e/features
mkdir tests/e2e/steps
World (Cucumber Hooks)
Now we can add a file to set up Playwright when Cucumber runs. In the e2e/steps directory create a file world.ts with the following content:
// e2e/steps/world.ts
import { After, Before, Status } from '@cucumber/cucumber';
import {
    chromium,
    type Browser,
    type BrowserContext,
    type Page,
} from '@playwright/test';

let page: Page;
let browser: Browser;
let context: BrowserContext;

Before(async () => {
    try {
        browser = await chromium.launch({ headless: false });
        context = await browser.newContext({
            ignoreHTTPSErrors: true,
            recordVideo: { dir: './playwright' },
        });
        page = await context.newPage();
        const baseUrl =
            process.env.MY_APP_URL || 'http://localhost:3000';
        await page.goto(baseUrl);
    } catch (error) {
        console.log(`Chrome navigation failed due to ${error}`);
    }
    return page;
});

After(async function (Scenario) {
    if (Scenario.result!.status === Status.FAILED) {
        this.attach(
            await page.screenshot({
                path: `./playwright/${Scenario.pickle.name}.png`,
                fullPage: true,
            }),
            'image/png'
        );
    }
    await context.close();
    await browser.close();
    const videoPath = await page.video()?.path();
    if (videoPath) {
        const buffer = readFileSync(videoPath);
        // Continue with the code to process the buffer
        this.attach(buffer, 'video/webm');
    }
});

export { browser, page };
This adds a Before hook to start a browser controlled by Playwright a return a new page object and a After hook to close the browser after the tests have finished. It will also save a video of the test run and add a screenshot if the test failed.
Configure runner
Next we need to create the Cucumber runner. Create a file e2e/cucumber-runner.ts with the following content:
// e2e/cucumber-runner.ts
const common = {
    requireModule: ['ts-node/register'],
    import: ['e2e/steps/**/*.ts'],
    paths: ['e2e/features/**/*.feature'],
    worldParameters: {
        appUrl: process.env.MY_APP_URL || 'http://localhost:3000/',
    },
};

// Default config
export default {
    ...common,
    format: ['progress-bar', 'html:cucumber-report.html'],
};

// Custom config for CI
export const ci = {
    ...common,
    format: ['html:cucumber-report.html'],
    publish: true,
};
We need to add a script to our package.json to run our tests:
{
  "name": "@elvintech/playwright",
  "version": "1.0.0",
  "private": true,
  "description": "Playwright+Cucumber demo",
  "author": "Robin Elvin <robin@elvin-technologies.co.uk>",
  "license": "MIT",
  "type": "module",
  "scripts": {
    "test:bdd": "NODE_OPTIONS=\"--loader ts-node/esm\" cucumber-js -c e2e/cucumber-runner.ts",
  },
  "devDependencies": {
    "@cucumber/cucumber": "^9.5.1",
    "@playwright/test": "^1.37.1",
    "ts-node": "^10.9.1",
    "typescript": "^5.1.6",
  }
}
Feature
Let’s create our first feature in e2e/features/google.feature
Feature: Google Main Page
  I want to open Google

  Scenario: Opening Google
    Given I open Google page
    Then I see "Google" in the title
Now we can try to run this to ensure everything is set up correctly so far:
yarn run test:bddThis should see the feature we created and because we haven’t implemented the steps it should suggest a skeleton for us:
1) Scenario: Opening Google # e2e/features/google.feature:4
   ✔ Before # file:/Users/rob/Projects/elvintech/cucumber/e2e/steps/world.ts:25
   ? Given I open Google page
       Undefined. Implement with the following snippet:

         Given('I open Google page', function () {
           // Write code here that turns the phrase above into concrete actions
           return 'pending';
         });

   ? Then I see "Google" in the title
       Undefined. Implement with the following snippet:

         Then('I see {string} in the title', function (string) {
           // Write code here that turns the phrase above into concrete actions
           return 'pending';
         });

   ✔ After # file:/Users/rob/Projects/elvintech/cucumber/e2e/steps/world.ts:43
       Attachment (video/webm)
Implement steps
We’ll now create e2e/steps/google.ts and add the following:
// e2e/steps/google.ts
import { Given, Then } from '@cucumber/cucumber';
import { page } from './world';
import { expect } from '@playwright/test';

Given('I open Google page', async function () {
    await page.goto('https://www.google.com');
});

Then('I see {string} in the title', async function (title: string) {
    const pageTitle = await page.title();
    expect(pageTitle).toContain(title);
});
We run the tests again with yarn test:bdd or whichever package manager you use and we should now see a passing test!
1 scenario (1 passed)
2 steps (2 passed)
0m01.825s (executing steps: 0m01.812s)
Report
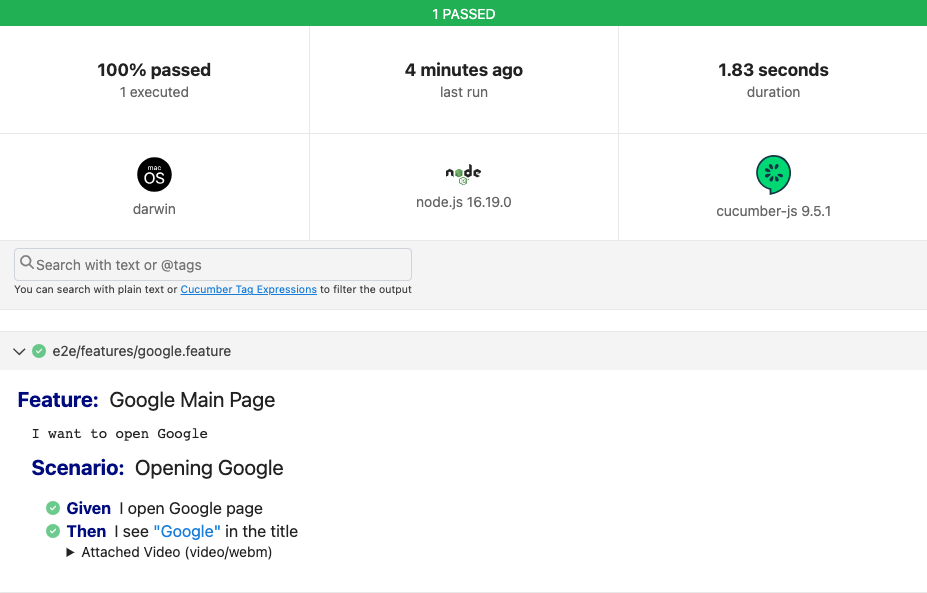
In the base directory there should be a file called cucumber-report.html – go ahead and open this with your browser. You should be presented with something like this:
Going Fullstack
Of course this is only testing our browser can reach a well known website on the internet. How would we go about testing our own application? There are a number of ways we can approach this. If we are developing an application locally and want to test it is meeting requirements before deploying we can simply set the environment variable MY_APP_URL to our local instance. With modern containerisation tools such as Docker we can run a full stack quite easily and use this to do our testing.
Another way that I like to add is to kick off these tests as the final step of my Continuous Delivery pipeline. Once all the checks and unit tests in the build process have passed, and a newly-built application is deployed into the UAT/pre-prod/integration etc. environment, I run these tests to ensure everything is at least running according to the latest spec.
Conclusion
We’ve seen how to create end-to-end tests using the Gherkin language and run them in a browser controlled by Playwright. With this basic example you can now expand your testing into multiple browsers and with feature specs to cover all your business requirements.
Gherkin’s advantage lies in its ability to bridge the gap between technical and non-technical stakeholders, promote collaboration, create clear and precise test scenarios, and serve as living documentation for your software. Its natural language format allows business analysts, product owners, and developers to understand and collaborate on defining the behaviour of the software without needing in-depth technical knowledge.
It is a powerful tool for driving behaviour-focused development and efficient test automation.